Friday, September 4, 2015

Let's get geared up 4--- with Heartfelt Creations All Geared Up collection


Let's celebrate using Gears!!  I used more of the gears that I created on Monday's post.  And I also added a little of the chain feature that was in the collection.  I used foam to pop up all the layers and also on the stamped and embossed sentiment along with a little TH Liquid Pearls Hot Chocolate that give the little rivet look.  
Blessings to you and the loved ones--JV
~~~~~~~~~~~~~~~~~~~~~~~


With Belief, there is Faith 
With Faith, there is Hope
With Hope, there is Belief
~~JVCreate~~

Thursday, September 3, 2015

Let's get geared up 4--- with Heartfelt Creations All Geared Up collection

On Monday I made up a bunch of gears.  And finally all the ink stains are gone from my fingers!!  I used foam to pop up the panels on the paper and on the stamped and embossed sentiment.  I used TH Liquid Pearls Hot Chocolate to make the rivets.  I did use a brown brad on one of the gears...Can you see it ;-)
This is a 6x6 card...
Blessings to you and your loved ones--JV


Wednesday, September 2, 2015

Let's get geared up 3--- with Heartfelt Creations All Geared Up collection

On Monday I showed how I made the gears on the cards...I used the paper from the HC All Geared Up Collection 2014 (HCDP1-248).  I cut out the panel from the paper and used foam behind it for some added height.  Same goes for the stamped and embossed sentiment.  
Blessings to you and your loved ones....


Tuesday, September 1, 2015

Let's Get Geared Up 2 --- from Heartfelt Creations All Geared Up

Heartfelt Creations All Geared Up collection....
Yesterday I showed you how to make the amazing little gears.  My fingers are still stained from it!  I stamped and embossed a little sentiment which I used foam under each layer.  I added the TH Liquid Pearls Hot Chocolate for the "rivets".  I used the background paper from the HC All Geared Up (HCDP1-248).  


Monday, August 31, 2015

Let's Get Geared Up with Heartfelt Creations All Geared Up Collection

 Let's Get Geared Up!! 
I cut out quite a few gears from the Heartfelt Creations All Geared Up die set (HCD 754).  I randomly put down some Distress Ink Forest Moss, Aged Mahogany, and Chipped Sapphire on the gears....
 ~~~~~~~~~~~~~

Then I rubbed Distress Ink Walnut Stain over the entire gear......

 ~~~~~~~~~~~~~~

I grabbed some Brilliance Cosmic Copper Metallic Ink and randomly smooshed down color....

 ~~~~~~~~~~~~~~~~~

And I grabbed some Brilliance Galaxy Gold Metallic Ink and smooshed down some more color....

 ~~~~~~~~~~~~~~~

And I did it again with Brilliance Platinum Planet Metallic Ink .....


~~~~~~~~~~~~~~~~
Finally I rubbed all the colours together....now time to wash the fingers...it seems like my fingers are always inked up!!  Now let's find a card to make....


~~~~~~~~~~~~~~
Here is a card I made for our car salesman, Tim, who helped find a car for our Dolly so she could go to college...(She is actually a high school senior doing the PSEO because she is really interested in Astronomy and Physics)  He helped us find several vehicles...very grateful for him!
~~~~~~~~~~~~~~~~~
I added some metal gears from the Tim Holtz line to give it a little extra wow!!  My DH told me that the TH Liquid Pearls in Hot Chocolate makes the dots look like rivets!!  I used the HC All Geared Up paper from the collection.  The centre panel is cut out and I added some foam under it for some added dimension.
I hope that you liked what I made!!  Blessings to you and the loved ones!!--JV

Friday, August 21, 2015

Heartfelt Creations Peacock Paisley Collection 4

If you read my 3 previous post, you already know what I did here.  The Peacock!  OMG!!  I am so in love with that little guy!  I stamped with my Memento Black ink and then I got out my Spectrum Noir coloured pencils.  I don't know the colours that I was using but it was blue and green ones.  I used a little SN coloured pencil in yellow for the centre areas of the flowers.  And some yellow TH Liquid Pearls...And I added some TH teal liquid pearls on the peacock feathers.  There are some on the stamped image also just for added interest.  You can hardly see it but it is there.  


Thursday, August 20, 2015

Heartfelt Creations Peacock Paisley Collection 3

I used the HC Peacock Paisley paper and cut out the centre part and popped it up on some foam.  I used some of the Sunkissed Fleur stamps and die using white embossing on white Bazzill paper.  I used a little Memento Cantaloupe Ink for the centre colour part.  And some yellow orange prills for the flower centres!! I used a little foam behind the sentiment.  I used a small paper piece from then paper collection. I embossed the sentiment in white.  Cute!!

Wednesday, August 19, 2015

Heartfelt Creations Peacock Paisley Collection 2

Again I used the HC Cut Mat Create dies to cut out the centre pic and popped it up with foam.  I curled the sentiement from the collection for a neat effect. and glued the edges down.  I used the HC Sunkissed Fleur stamp embossed white on white, then I used Memento Cantaloupe Ink for the inside of the flowers, shaped and added a bit of TH yellow Liquid Pearls for the centres.  And my sticker corner for a little added glitz.  Quick and very lovely!

Tuesday, August 18, 2015

Heartfelt Creations Peacock Paisley collection

I used the Cut Mat Create dies to cut out the centre picture and used foam to pop it up.  I used a sentiment from the HC Peacock Paisley Paper and used foam for added dimension.  I layer the paper on some DCWV shimmer paper in blue.  And some corner stickers from my stash.  Really a quick and simple card but it has a Wow factor!! 


Monday, August 17, 2015

Another Poppy Card from Heartfelt Creations!

I used the same techniques as the previous post.  The poppies turned out so pretty.  I couldn't help myself.  I did the card opposite as the previous one as you can see.  I wanted to use up some of the leftover dies.  I cut out a rectangle in white cardstock for the inside and gave it a little stamp from the HC Poppy stamp set.  I can't decide which I like better.  I really love them both.  Each bring something special that I love!


Friday, August 14, 2015

A Poppy for today

 I had to try out the new Heartfelt Creations Poppy Stamp and die.  I used white Bazzill cardstock, stamped the image with Memento Black Ink.  I used Memento Ladybug red for the inside part of the poppy and Memento Rhubarb for the outer edges.  Then I used Faber Castell Glass Bead Glitter Gel and used my finger to daub it on...then let it dry.  I used some Prima Say it with Crystals pieces for the poppy center.  I had some black shimmer paper in my paper stash that I used with my Spellbinders Dies S6-020.  I also used some Michael's white shimmer paper and used foam to give it a little dimension.  Stamped the sentiment in Memento Black.  I hope you like it!

Friday, August 7, 2015

Heartfelt Creations Bleeding Hearts


I used Heartfelt Creations Romantique Garden Collection to make these pretty little bleeding heart flowers.  I used Spectrum Noir markers to colour the flowers.  I am truly sorry but I didn't write down the specific colours.  I die cut some Bazzill white card stock with the HC Ornate Gateway die and adhered it to the front panel.  The panel that the bleeding heart flowers are foam layered and the bleeding heart flowers have a little sqaure of foam under them for added dimension .  A little sentiment added to the top and the card is completed.  It measures 6x6.

Thursday, August 6, 2015

Another DCWV Royal Garden Mat Stack card 5x7 layered with a gold mirror cardstock backing.  A dark blue ribbon and bow embellished with a gold button.  Simply elegant, I think.

Wednesday, August 5, 2015

I used glossy photo paper and inked the background with a dark blue ink and alcohol blending solution.  I found the gold and pearly flowers at Michael's in the MStewart section.  I added a LalaLand Die cut butterfly with pearl spray for the trail.  Layered up a sentiment on gold mirror card using my spellbinders 8 dies and Nestabilities S5-148.


Tuesday, August 4, 2015

Last Wedding element on cards

This is a large 5x7 card.  The magnificent wedding element is from Michael's.  Black and white shimmer paper from Michael's, also.  Silver ink on the sentiment.  And hot glued the element down.  Quick and easy and oh, so pretty.  

Monday, August 3, 2015

Wedding elements on cards 3

I made these using the same techniques and paper that I described in the previous posts.  


Friday, July 31, 2015

Wedding elements on cards 2

I layered some gray shimmer paper under while shimmer paper from Michael's and did the same for the sentiment.  I added the element and attached a centre piece flower.  Prettier than the picture can ever take.  

Thursday, July 30, 2015

Wedding elements on cards.

I think I am spending too much time at Michael's!!  I found these elements in the wedding aisle there.  I used my shimmer paper from Michael's, layered it on some old CM paper, stamped a sentiment, cut it out with a Spellbinders die.  Because the element was so bulky, I had to use a glue gun to adhere it.  And put it all on a silver note card that I found at Walmart.  Quick and simple

Wednesday, July 29, 2015

Plain and simple birthday cards


 I used the DCWV Royal Garden Mat Stack to make these two cards.  I used Deco corner chomper on the corners to make them a little more elegant.  I layered the paper on Mirror Gold cardstock.  I have no idea where I got it but I think it was from Creative Memories years ago.  I embossed the birthday sentiment on shimmer paper that I bought in bulk at Michael's.  I used the Spellbinders Labels 8 and dies to cut out the sentiment.  I used Spellbinders S5-148 and S5-208 and used gold mirror paper for behind the sentiment.
The sentiment is layered up for a nice effect.  Plain and simple yet elegant.


Tuesday, July 21, 2015

The last card from the Heartfelt Creations Sparkling Poinsettia Collection.

This was made using the image from the HC Sparkling Poinsettia Paper HCP-256.  I used the HC Cut Mat Create die to cut out the centre image from the paper.  I foam popped up the image after I layered it on DCWV red shimmer paper.  I used the same DCWV red paper to layer the sentiment just because I thought it added depth to the card.  It seemed like the sentiment was a little lost without the little red behind it.  I really think it is cute.  


Monday, July 20, 2015

This 6x6 card has a 3 inch front flap that I adhered the red scrolled HC Sparkling Poinsettia Collection paper and used the HC Raindrops on Roses HCD-743 die cut to layer behind the HC paper for added interest.  I made sure to line up the image with the cutout on the inside of the paper so it looks like one whole image.  I really like these cards. See my earlier Christmas in July post on how I coloured my flowers and leaves.  Then I shaped the flowers and clear glued gold beads for the centres of the flower.  

 I used Memento Wild Hare ink to stamp the HC Joy to the World HCPC-3683 image to the inside corners for added interest.  It looked a little plain to me and I think it looks so much prettier now.

Friday, July 17, 2015

Heartfelt Creations Sparkling Poinsettia Card kit collection-Christmas card 3

This was such a cool card to put up.  They pulled a die cut from the HC Everyday Heros HCD1-761, stamped the sentiment HCPC 3682 and cut out a circle.  Another image from the HC Sparkling Poinsettia Paper HCDP1-256 was cut out and included.  Check out the Christmas in July post from a couple days ago to see what I used to colour the image.  
I popped up the die-cut over the image. Then adhered the leaves and flowers over the images.  I can't wait to send out cards at Christmas!!  


Thursday, July 16, 2015

Christmas card 2

I added a bit of corner stickers from my stash around the side and corners for a bit of glamour.  I stamped and die cut the extra poinsettia.  See to my previous post for how I coloured the image.  I clear glued some gold jewel beads into the centre of the poinsettias.


The inside of the card that I layered on HC Everyday Heros (HCD1-761) and the cutout image from the card collection. 


Wednesday, July 15, 2015

Christmas in July

Christmas in July!!!
I love this new collection, Sparkling Poinsettia by Heartfelt Creations!  I did up the HC Card Collection as I couldn't wait to see what I could do with them.  I pretty much followed the directions...I did add some exrtra embellishments...I couldn't help myself!!  Have I mentioned how much I love this collection!
The DCWV shimmer green was foam layered over the DCWV shimmer red that was adhered to the card base.  I layered more foam tape under the HC red holly paper...the stamped HC image was adhered directly to the DCWV green layer.  I coloured the HC stamped and die cut images with my fav Spectrum Noir.  SN DR6 for the lines and shading, CR11 for the overall colour on the poinsettias with another fav item, Wink of Stella Gl.Red 020 for the overall shimmer.  DG3 for the veins on the holly leaves and swirls and DG2 for the overall leaf colour and Wink of Stella Gl Dark Green 042 for the veining areas to glitz up...It turned out quite lovely.  So much better in real life...Hope you like it!

Saturday, June 20, 2015

Oh, Baby!!

I won the Heartfelt Creation Sweet Lullaby Collection in a (Pinterest) Pin to Win give-away.  I was doing some late night pinning on Pinterest on my IPad (I have insomnia problems) and there was my name...I literally shook and then I woke up Dear Hubby, which is not nice as he gets up at 4:30 all the time for work.  I was so excited!!  I got up and grabbed my laptop in the livingroom and emailed HC!  I didn't get much sleep that night!!  And when it came in the mail, I was overwhelmed......and that started my love for Heartfelt Creations.  They touched my heart and I found something that making cards, (something that I didn't even like doing) as the outlet I needed for my creative side.  Ok, enough of the history lesson....
OH, Baby!!  One on the left was done with light blue Colorbox Ink from a multiset that didn't have a name as was the pink one.  The gold one in the middle was embossed with gold.  That one is so much prettier than in the picture.  They are layer up with foam tape.  


I had orginaly threaded the ribbon through the umbrella and noticed if I touched it, it would push out.  I didn't want that to happen.  So I did a little thinking and decided to encase the ribbon....I cut just the edge part of the umbrella --see pic below--bone folder is pointing at the piece,  I fussy cut to match the umbrella.


Then I threaded the ribbon through the umbrella--see pic below--and the bone folder is pointing at the finished piece.

I turned over the umbrella so that the flat part faced up--see pic below--then the little piece that I cut, I glued that over to match the underside of the umbrella.  That will keep the ribbon from pushing back out.  Make sure that you watch to make sure the pieces match, I accidentally transposed one and it didn't line up and I ended up making a new piece.  Lesson learned!  

Friday, June 19, 2015

Heartfelt Creations My Hero Card for my Hero!

I really, REALLY wanted this HC My Hero Stamp.  My dear Hubby has been in the military for over 35 years!!  I NEEDED to make this for him.  I used Gathered Twigs Distress Ink with my water-brush to used on the boots and the edges of the stamped image.  I used my DCWV shimmer paper to make the layers and put some foam tape to raise up the stamped image.  I used the Tim Holtz clock-face metal elements and hands on it.  My DH has served overseas a few different time.  He is a very wonderful and incredible guy to our kids and me.  I feel very honoured and blessed that he chose me to be his wife.


Thursday, June 18, 2015

Another Heartfelt Creations My Anchor card

I loved doing the last HC My Anchor Stamp and since I had stamped and coloured an extra image, I wanted to try to imitate it a little.  This is what I ended up with.  Check the previous post to see what I used.  I am feeling lazy tonight.  Forgive me....

Wednesday, June 17, 2015

Heartfelt Creations My Anchor Card


I got stumped on this card.  I had stamped the image from the HC My Anchor Stamp (HCPC3662).  I used my waterbrush and Stormy Sky, Gathered Twigs, Pumice Stone Distress Inks to colour the image.  I used a silver Wink of Stella to give a sparkling effect on the water.  I used my Spellbinders to cut the image out.  I layered up the card and used foam tape under the image.  And I just didn't like it.  I stared and stared at it.  Finally I took my card and showed it to my dear Hubby.  Hubby looked at it and said, "You should punch a hole in the anchor and tie rope on it....."  I raced back to my ribbon centre and found some blue and white twine.  I put it through the hole and glued the twine around the card.  I love the effect and it looks so much better.  


Tuesday, June 16, 2015

Heartfelt Creations All Geared Up

I had so much fun making this card.  I just bought the Heartfelt Creations All Geared Up die and stamp.   I stamped the HC Cogs and Gears (HCPC3636) Stamp in Memento Rich Cocoa.  I distressed the edges and then used Walnut Stain Distress Ink around the edges.  I used a little Tea Dye and Gathered twigs to add a little depth to the stamped images.  I also used a little Forest Moss to imitate tarnished copper.  I also used a copper Memento Ink that I hand rubbed in spots to give it a little sheen.  I layered it over green DCWV Shimmer paper that I used a Spellbinders Edge Die on.  I used an old paper bag to stamp and emboss in Copper for the sentiment and distressed that also using Walnut Stain.  I added a Tim Holtz gear and brad in one of the gears that give movement to the card.


Monday, June 15, 2015

Father's Day Card


Happy Father's Day!!
I used some DCWV Mariposa Mat Stack paper along with Spellbinders Peacock Die cut out from the DCWV Shimmer Paper.  Black embossed the sentiment for a simple look.


Monday, June 1, 2015

Decorative Lace Border scrunched

I bought a new Heartfelt Creations Decorative Lace Border die (HCD-713).  I used a shiny brown Bazzill paper to cut the die out.  I studied the die wondering how I was going to use it.  I remembered a video that scrunched up the die.  I tried to pleat it and this was the result.  Not too bad.  I had to use hot glue for it to stay.  I put a flower over it to cover up the glue.  


Sunday, May 31, 2015

Recycled Paper project

I was sent a lovely card from my favorite craft store (45 min drive to get there).  I loved the delicate green of the card.  I cut the card into 2 pieces and layered them.  I found Recollections Butterflies and K&Company spray at Michael's. I stamped the sentiment on a Recollections champagne glossy paper. This was done on a pre-made A2 card.


Saturday, May 30, 2015

Ladybugs!!

I found these ladybugs and just fell in love with them.  I got them from Heartfelt Creations.  I went with dramatic colors on a silver A2 card.  I used a Colorbox pink then tipped the petals with a red Colorbox ink.  I used the same red ink on the ladybugs then used a black glitter glue on the dots.  And of course, I used my Wink of Stella on everything...I couldn't stop, I love that stuff!!  The lacy doily under the flowers is HC Layered Scalloped Posy (HCD-717).  The flowers and ladybugs are on the Classic Sunflower Stamp  (HCPC-3626) and die (HCDC1-753).  The flower centres are from Recollections.

Friday, May 29, 2015

Mother's Day 6x6 Card


I made this 6x6 card using the Heartfelt Creations Romantique Garden Collection Card kit.  I sent this to my mother for Mother's Day.  I used my Spectrum Noir markers on the bleeding hearts.  I am sorry but I do not remember what colours I used.  I used Forrest Moss distress ink on the leaves/flourish.  Then added a little bit of white flat-backed pearls for a little glamour.  My mother said she really liked it...Thanks, Mom, I appreciate that!

Thursday, May 28, 2015

Using the window element from an earlier post...

I was able to use the HC window element from an earlier post in making this card.  I stamped and image from HC Birds and Bloom Collection and coloured it with my Spectrum Noir markers.  I distressed ink the flowers and added Wink of Stella Gl. Gold on the top of the flowers and the leaves.  I added a little Gold embossed vellum Butterfly.  My son suggested it just needed something more and it wasn't "balanced".  Have to say, I was impressed when he told me that!


Wednesday, May 27, 2015

Vellum Flowers with Silver Embossing

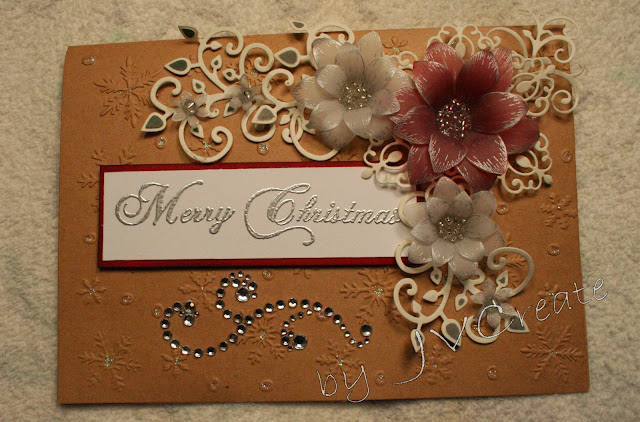
This was a bit of a play-around.  I found some brown craft cards and envelopes at a local Walmart.  I embossed it to see what it would look like.  I added a little iridescent glitter glue from my stash to some of the embossed flakes and such.  I stamped and embossed in silver some flowers and die cut them out with the matching die.  I used Spectrum Noir DR7 on the back of the largest flower.  I had some leftover cardstock in red and I distressed it with Walnut Stain.  Arianna Lace under the flowers...A little bling....I think it looks good.